 |
Marking and tagging plants |
 |
Keeping track of which plants grow where gets to be a bit of a challenge
when you've got hundreds of species and varieties, and grow new and different
ones every year. Over the years, I've tried a few approaches to mark their
locations, and have settled on a few favorite methods. On this page, I'll
show you what I use, and tell you about the advantages and disadvantages of
the different approaches.
First - my rejected methods
When I started gardening, I often used the plastic label that comes with the
plant from the nursery. It's certainly convenient, and they're about the right
shape and size. But I don't use them any more, for aesthetic reasons: with
their colorful pictures, they draw too much attention to themselves.
These handsome copper markers tempted me a few years ago. They are small, start
out coppery-shiny, and fade to a dull brown within a few months of being
outside. You can write on them with a permanent marker, but their real
attraction to me was the ability to write in relief into the thin sheet copper,
using an inkless pen and a bit of manual force. This promised to be really
permanent! But the markers had two drawbacks: first of all, they still reverted
to a nearly illegible state within a couple of years, through weathering and
corrosion. But more importantly, these markers just weren't large enough to
dig into the soil and stay put. Even in the rock garden, where I tried to put
them to use, they were always coming out and getting strewn all over the place.
So I gave up on them. I still have some - if you're attending my plant sale
and would like to have them, write me an e-mail and I'll stash them away for
you.
Permanently marking established plants
The cap-style marker |
For lack of time, lack of supplies, or just pure laziness, only a small
minority of the plants in our garden are marked in such a way that visitors
can find out what's growing where. I've had ambitions of more widespread
labeling, especially ahead of the garden tour that brought many visitors
around in the summer of 2005, but somehow it hasn't happened yet. But slowly,
more plants are getting labeled, mostly because I try to make a point of
marking new nursery purchases.
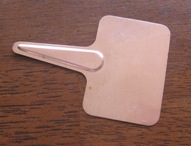
And for those labels, I have settled on one
kind of marker, available from Paw Paw
Everlast Label Company: the business end is an all-zinc nameplate, attached
to a galvanized-wire standard.
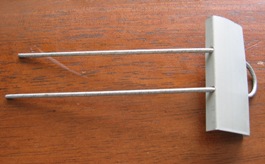
The miniature marker |
Simple, reasonably elegant, and quite functional.
I use two styles, shown in the pictures. The miniature marker is handy for
the rock garden, and to mark other smaller plants around the garden. It's fairly
easy to install, because its legs don't penetrate so deeply, and are less likely
to hit a stone in the process. Of course, on the flipside, they get uprooted
a little more easily than the second type: the cap style marker. This one
has all the advantages and disadvantages that come with longer legs, and one
additional somewhat troublesome feature: the nameplate is attached to the standard
by a simple wrap-around, and is prone to sliding off.
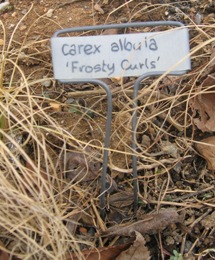
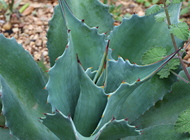
In its native habitat |
This happens more so with
plants close to pathways, where children's feet are eternal enemies of order
in the garden.
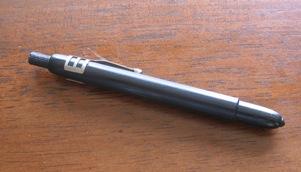
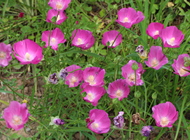
Sleek simplicity |
Another reason I like these labels: they are easy to write on, using a
black crayon (which Paw Paw is also happy to sell). I prefer the mechanical-pencil
style, which keeps a sufficiently fine writing point and lasts forever. The
writing itself doesn't last forever, but holds up for at least a year or three,
and is easy to refresh when necessary. A permanent garden marker (see below)
will also mark on these labels, but I don't like the look as much as the crayon.
Lead pencil fades faster.
Utilitarian memory aids
I may not be consistent with my decorative markers, but I've learned from
experience that there can be no shortcutting basic plant marking habits. No
matter how obvious you think it is which plant you've put in a certain place
in summer, come early next spring it's anyone's guess - unless of course you've marked
its place. And that's where my everyday plant markers of choice come in.
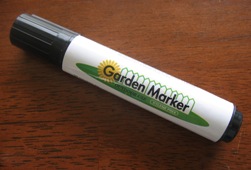
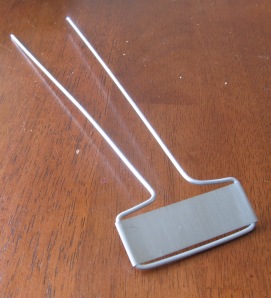
A manly marker |
I'm not exactly original here: I follow the time-honored tradition among gardeners
of recycling spent vinyl blinds for garden purposes. After a few slats have
broken and the bright white has yellowed a bit from several years' exposure to
the sun, these handy window treatments may not look so hot any more in the
interior decor - but a whole new life awaits them in the garden!
My modus operandi is to cut the miniblind slats into about five-inch lengths,
and then cut them lengthwise. I used to use the full width, but they stand out
too much in the garden that way. Don't try to mark them with a standard
permanent marker: it fades within a single season. On the other hand, the
permanent garden markers sold by various mail-order companies do quite well.
I've always gotten mine from Mellingers (now defunct), and although different
years' supplies had different markings on the outside, the inner workings are
identical.
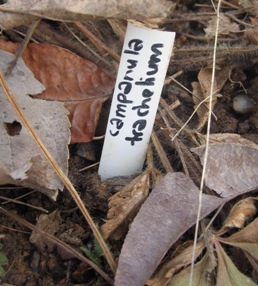
Its perennial companion retreated
into the soil, this label bravely waits out winter |
The initially fine point wears down a bit after a while, making it
somewhat more difficult to write all the plant name information along the narrow
label, but the markers last me about a season, and the writing holds up for at
least two.
The resulting black-on-white labels are marvellous for seedling pots
and for the plants I offer in my plant sale. In the garden, they do have their
drawbacks: in our rocky clay soil, planting them can be a
challenge - to avoid breaking them, more often than not I need to stick a
trowel into the soil and slide the label alongside it.

Just imagine how hard it would
be to remember which plants are where without these tags... |
In our garden, these labels are not intended to advertise the plants'
identities to passersby. I usually apply the label behind the plant, and stick
it deep into the soil, to where I can just make out its white top. That way,
they are less prone to frost-heaving and other modes of dislodging, and the writing
is protected from sun-bleaching.
Not that they don't get heaved out anyway. This is especially a problem in
our nursery area, which has more friable soil than most other garden areas.
It's funny to walk by this area in mid-winter, and see all the labels, which
were hardly visible in summer, pushed up out of the soil, some even all the
way out and toppled over. I'm contemplating methods of serrating or barbing
the labels so they'll stay put better - but I doubt I'll ever do it. After all,
these are intended to be temporary, until a) the plants in question have hit
the compost pile, b) I know the plant so well that a label is no longer needed, or
c) the temporary label is replaced with a permanent one (see above).
And the handcrafted
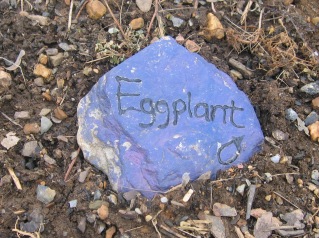
Note the artwork! |
No page about garden markers would be complete without showing off the
handicraft of my son (heavily aided by my wife), who offered me a whole set
of rock vegetable markers for Father's day one year. They've proven quite
durable, although they serve more of a whimsical decorative purpose than a
practical one.
Visitors to this page have left the following comments| karen habben | Feb 17, 2006 | I was warned that the cap style metal label would slide off it's legs. I have found this to be true. I'm sorry I bought 100 of them from Pawpaw everlasting label co. When I complained they said they didn't have this problem and told me to fix it with pliers. I would not buy them again for this reason. The miniature marker at least can't fall apart in this manner. I was a little disappointed with paw paw for denying this problem exists. That's 3 of us who have had it happen ...at least. |
| Les | May 15, 2006 | I have tried several types of the Everlast labels and finally settled on the hairpin type for most plants. They are smalllbut yet long inough to stay put. I use a label maker that uses 3/4 inch laminated label tape that fits nicely on the label area. I also dip the pin ends (the part that go in the ground) in a rubberized coating like Elasto-Seal or Dip-it. Otherwise, the pins start to rust quickly in our soil (NW Ohio) These labels hold up for many years done this way.
Les |
| Tracey Smyth | Jun 17, 2006 | You might take a look at the website gardenlabels4you.com. They make laminated custom labels that will fit on the Paw paw markers and the cost is quite reasonable.
Thanks Tracey - I think visitors to this page will find your reference useful! |
| Paula | Aug 09, 2006 | I really like the Paw Paw labels - if you bend them slightly after sliding the plate into place, it helps with any "slippage" problems. Also putting a decent-sized drop of wood glue right on the two bottom holes of the plate (after the stake is in place) solves potential slipping permanently. |
| Phyllis | Jul 08, 2007 | Paw Paw marker, cap style, was problematic for me also. The label area plate kept falling off its legs. I corrected this by wrapping a piece of wire around the 2 legs, just under the label plate. This prevents it from doing the splits and losing the label. |
| JOHN | Aug 13, 2007 | Phyllis, July 08,07 GO TO THE MINITURE MARKERS SPREAD THE LEGS BEYOND NORMAL SO THERE IS TENSION, THEN COMPRESS, THEN SLIDE THE PLATE ON THROUGH THE SMALL HOLES.tHES ALWAYS STAY UP. |
| Cathie | May 08, 2008 | I also use cut up pieces of old mini-blinds for temporary labeling. One disadvantage of this method however, is that mini-blinds are made of pvc and are typically high in lead. Just a heads up for those who might find this undesirable. |
| chris olson | Jul 14, 2008 | Perfect! These notes and comments are just what I needed to make a decision about garden markers. The "sharpie" just doesn't hold up in direct sunlight. Good work with the descriptions in laymen's terms and the photos are VERY helpful. Real plants in the real world! Oh, for anyone looking to produce their own labels, the Brodart company carries 4mil UV label protectors. They use them in libraries for protecting call number labels on book spines. http://www.shopbrodart.com |
| Kathy(zone3) | Feb 22, 2009 | I use the cut blinds also but till this year couldn't find something that would stay on them. Last fall I found a "paint pen" from craft stores. It seems to be holding up and lasting. It was a very reasonable price also. |
| Jean Ward (confussedlady) Daves Garden | Feb 27, 2009 | I am told by someone at Daves Garden that a lead pencil will not fade on mini blinds. Will try this summer. |
| Joanne Guth | Mar 16, 2009 | I use clear plastic knives and a permanent garden marker. |
| Julie Olsen | May 27, 2009 | My parents gave me their method for permanent (though not very elegant) labeling - they use white plastic knives, but instead of a marker they burn the name in with a wood-burning tool (or soldering iron). Since plastic breaks down so slowly, the label will probably outlast all of us! We don't have frost heaving problems here (northern Saskatchewan, Canada) but I suspect the little serrations on the knives help with that as well. |
| R V James | Aug 20, 2009 | I also like the cap style labels from Paw-Paw best (just bought a thousand more!) I laser print plant names on Avery Easy Peel 1/2 x 1 3/4 Inch Clear Return Address Labels (5667) and place them on the metal labels. All those that I placed last summer survived a WI winter - no labels came off or faded. I really like the neat look of the printed labels in my garden. |
| Larry Crosby | Sep 02, 2009 | I also use the Everlast labels from PawPaw. I also had the problem of sliding and bending of the thin metal. I now double up on the label portion. The extra tight fit keeps them from sliding, and more importantly they do not bend as easily when bumped. I use a vinyl label maker for the labels, which are then attached to the metal labels. |
| Marcia Meigs | Jan 15, 2010 | Gee Rob, I was so excited. Thought, after 45 years of gardening I would find an answer as I have lost so many names of plants after all these years and my back cannot take the thousands of reinsertions over the winter. Many of the ideas are usedful and already tried but not a one will solve the heaving here. I am dying to meet an engineer and make a product to sell. I am thinking something like the following: A single long upright metal porting for writing, about 1/2 x 3 or so inches, which continues to a very strong nail like stem, with a flattened broad base which is bent at a right angle to that stem, the stem being at least four to five inches long. One uses the pointed round heavy steel implement, also about 4 to 5 inches long, to pound a hole to receive the entire stem and base extension(obvious the diameter of the implement has to be slightly larger than the "diameter" of the stem plus extended base. Then one uses the implement, one's heel, or a trowel to jam the dirt back against the stem. Will it heave? I need a couple to try..smile..and if someone wants to manufacture these I would expect a royalty please.
Meanwhile I will try cutting some v shapes wedges out of venetian blinds to see if it prevents heaving. I doubt it because all is on a single plante.
Good idea - let me know if it comes to be. If robsplants.com is the medium through which your plan comes to fruition, can I have a royalty too? |
| Carmen Leibel | May 27, 2010 | After several years of trying all sorts of things, I've decided this year to try a more permanent "pretty" approach. I have no idea it if will work. I live in Saskatchewan Canada, Zone 3. Winter is long and hard, summer is short and sweet. I've purchased small 2x3 inch ceramic tiles (probably about 50 cents a piece), and I'm going to use a permanent black marker. Ceramic may in fact crack my winters, and permanent markers....well... If anyone has tried this approach, I would love to hear your story. cleibel@yourlink.ca
Sounds like it might work out nicely - but you'll need to use a marker that's not only waterproof, but also fade-proof. Many gardeners have reported success with paint pens, which should work nicely on ceramic tiles. |
| Kelly | Apr 01, 2011 | I was having a marking problem with my staghorn ferns. Even though I attach a plastic name plate to the board they are mounted on, the name & date fade. The ferns I have acquired are often are hard to read the spellings of "a"s look alot like "o"s, etc. Thus I stumbled onto your page here. My first thought was the vintage embossed label makers by Dymo. I was hoping something even existed in metal & I found this:
metal embossing label :
http://www.amazon.com/Embossing-Metal-Tapewriter-Embosser-101105/dp/B000FD7Z7I
The Amazon page even has a review by someone who uses this in her garden. It is a little spendy but I think probably worth it for the amount I will use it. I'm guessing it wouldn't be hard to attach these to the clothespin legs for the garden uses you need them for. Probably with some stiff wire, pliers, heavy wire cutters you could make your own legs.
For my veggie garden we rotate crops and the tags often get lost in winter. I am looking for a more biodegradable option like wood popsicle sticks that I'll be less upset about getting blended back into the soil. |
| Lyle | Apr 28, 2011 | I have been making my own labels by buying blue anodized metal tags from Gemplers online catalog (8 cents per tag in boxes of 100), using an engraving tool ($18.00) to engrave the plant name, source, and date planted onto the metal tag. Then buy stiff galvanized wire from the local Home Depot (comes in sticks 5 feet long, in bundles of 10 - used for hanging acoustic tile ceiling framing). Cut the wire to short length and twist one end into a loop to put the metal tag onto. The other end of the wire gets pushed into the soil by the plant. Have used for over 4 years and still look brand new!! The link to Gempler's website for the metal tags is : http://www.gemplers.com/product/152672/Round-Blank-Blue-Anodized-Tags-100-box
Sounds like a great system, Lyle! Thanks for sharing. |
| She | May 02, 2012 | Hi! Great ideas here! The ones I make are a bit more time consuming, but pretty. It will take a while to get around to all the plants I want to permanently mark this way, so in the meantime I am going with a variation of Lyle's idea.
Here are the prettier ones I make:
Stonepylon.com page
Thanks for the informative page!
Wow, those are very pretty! I must admit I've given up on permanently labeling any plants in the garden. It seems like whenever I felt a plant deserved one and I made a marker, it was the next thing to die. So now my markers serve a strictly utilitarian purpose: reminding me of what's planted where, while being as invisible as possible. |
| Mea | Oct 13, 2012 | I use old blind slats as well, most from either a local recycling centre, or "retrieved" from blue boxes, with a twist. First year I used a Sharpie to write the info. By next summer, most were illegible. Then I added a piece of packing tape over the writing. So far, these have lasted 3 years and are still legible. However, my Mom did comment that the garden looked like a graveyard, so I have switched to dark slats, written on with a white paint pen and then covered with tape. I save the white slats for "selling" plants and prefer the heavier 2" slats if I can get them. Them I print a label and stick it on, but the tape must be firmly pressed down around all edges. This does allow a greater amount of information, since I can set a font at smaller than I can legibly write . I never have to worry about marking for sun or shade.. my garden is a full sun field! |
| gerty | Oct 28, 2017 | Fimo (hobby putty that is baked to hardness in kitchen oven) with names inscribed, baked around bent wire harvested from old coat hangers |
I welcome comments about my web pages; feel free to use the form below to
leave feedback about this particular page. For the benefit of other visitors
to these pages, I will list any relevant comments you leave, and if
appropriate, I will update my page to correct mis-information.
Note that I discard any comments including
html markups, so please submit your comment as plain text. If you have a
comment about the website as a whole, please leave it in my
guestbook. If you
have a question that needs a personal response, please
e-mail me.
Last modified:
June 14, 2013
Contact me
|