 |
Germinating seeds in baggies |
 |
The concept
My standard method of germinating seed is what I call "the baggy method". It's
my particular variation of an approach often used to check viability of seed,
described by Norman Deno as the method used in his germination research, and
employed by avid seedstarters the world over. An additional reference is a
FAQ
by the seed-starting community at GardenWeb. It's quite simple, really:
enclose seeds within a folded dampened filter paper or other moist medium,
place this in a zip-lock baggy, and wait for it to germinate. Well, there are
some twists and turns, tips and techniques - I'll describe those on this page.
Filters and baggies
I use small (3" long by 2" wide) zip-lock baggies for most of my seed purposes -
both storage and germination. They come in two basic variations: with and
without a white writing strip in front. The former can be marked with
a regular ballpoint pen, the latter require a fine-tip permanent marker. Either
works for me. I discuss sources for baggies and other requirements on my
supplies page.

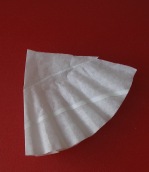
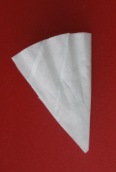


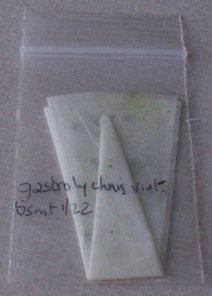
As for the filters - I've settled on plain basket-type coffee filters, the
kind that unfolds into a flat circle. The cheapest ones you can find work just
fine. I cut these in half, and fold them as shown in the photos above: three
times in half upon itself, and finally the tip folds up and over the wider part.
This fits easily in the baggies, and has just the right moisture-holding
capacity for germinating most seeds.
Getting things started
To start the seeds, I undo the last two folds of the filter paper, and spritz
both sides with tap water using a general-purpose spray bottle. The goal is
to get the paper evenly moist but not sopping wet. When I go overboard and
saturate the filter, I simply lay it flat on the table and squeeze out the
excess water.
 |
For most varieties, I now place the seeds on one quadrant of the unfolded
paper - say, the top left portion of the middle photo above. Because I keep
careful records of my germination efforts, I either count out the seeds as I
place them, or (for smaller seeds) I count them after I sprinkle them on the
filter. I try to distribute them fairly evenly across the target area, that
makes it easier to deal with them as they germinate. Then, I remake the last
two folds, apply a little pressure to ensure good contact between seeds and
paper, and slide the contraption into the ziplock baggy. I leave just a portion
of the zip strip undone - enough to allow some air exchange, but not so much
that the paper dries out too quickly.
The procedure is slightly different for seeds that require light to
germinate. In those cases, I refold the filter in such a way that the seeds
are covered by just one layer of paper, with the rest of the paper underneath.
Make sure to mark the baggy with the name of the seed variety! I also mark
the date I started the seed, which makes it easier to find things in my seed-starting
logs.
Meeting all their needs
Now the seeds are exposed to moisture, which is a basic requirement for all the
biochemical processes that will eventually result in germination. But many
varieties have other requirements we need to meet, without which germination
simply won't occur. Let's start with the easiest first:
Temperature
Many varieties are perfectly happy to germinate at room temperature, without
any further pickiness. Our basement is about 65°F in winter, and gets a
little warmer, to about 70°F when things warm up outside. That's fine for
lots of seeds. Warmer temperatures may actually inhibit germination in some
varieties.
Some seeds, especially those of warm-weather plants, require somewhat
warmer temperatures. Tomatoes, peppers, and eggplants are good examples.
Temperatures in the range 75-80°F tend to work well. For these varieties,
I place the baggies flat on top of one of my shoplights. You may have a
different place that provides a slightly warmer microclimate of just
the right temperature.
Many seeds, especially those of perennials, shrubs, and trees from areas
with cold winters, require a cold stage before they will germinate. Some
need some time at room temperature before the cold stage. Some even require
repeated cold and warm cycles. In germination references, these requirements
are often referred to as warm and cold conditioning or
stratification. It's important to realize that these stages must be
provided while the seeds are exposed to moisture: the requisite biochemical
processes simply cannot take place without it. To seeds, cold usually means
from just below freezing to just above. Very few seeds require freezing to
germinate - the refrigerator, on the other hand, is a great place to provide
the cold stage. I keep an upright Tupperware container in the fridge that holds
all the baggies of seeds that are undergoing their cold stage. This stage can
last as short as two weeks, and as long as four months.
Light
Quite a number of seeds, especially tiny ones, require exposure to light to
germinate. I described above how for these seeds I fold the filter paper
such that only one layer of paper covers the seeds - that's thin enough for
light to penetrate. I then lay the baggies close to my grow-light
setup, seed facing upward, so that they are exposed to light for about 12
hours per day.
Chemicals
There are a few seed varieties that just don't like to germinate. Nature has
built in complex mechanisms and requirements that aren't likely to be met in
artificial conditions. Biologists have discovered various substances, such
as plant hormones, that helps these "difficult" seeds germinate. The most
popular is Gibberellic Acid GA-3. Although I've dabbled in trying this for
seeds that won't otherwise germinate for me, I really don't have enough
experience to know whether it works. The good news, though, is that the
baggy method makes it easier to experiment, since it allows precise control
over the amounts, concentrations and timing of any chemical applications.
For more information, read Norman Deno's book or take a look at J.L. Hudson's
gibberellic acid page.
Waiting for them sprouts
Now it's time to sit back and let Mother Nature take her course. But
don't sit back too long, or Ma will get angry or impatient! I typically
check the baggies once every 3-7 days, and spritz the filter paper with some
water if it's about to dry out. The ones being kept warmer and those exposed
to light get checked more frequently, since they dry out faster.
Without light and at cooler temperature, the filter paper stays good for
several months (unless the seeds brought in their own mold with them - see
below). But give them either light or heat, and mold/algae grow much more
quickly, and the filter paper starts deteriorating in a few weeks. Even
though this does not necessarily spell death for the seeds, inspecting the
baggies becomes an unappetizing task. Transferring to clean filter paper
will give things a fresh start. But for these reasons, I try to germinate
without special treatment whenever possible. In my seed
trials, you'll see instances where one year I germinated "with light",
and the next year without. If germination was fine both ways, guess what
I'll be doing from now on?
They germinate!
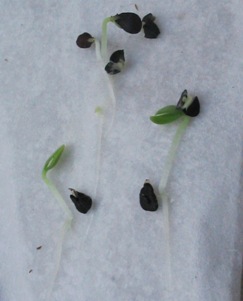
Gastrolychnis seeds germinating. Note how some have already freed
their leaves from the seed itself, while for others only the root extends from
the seed. |
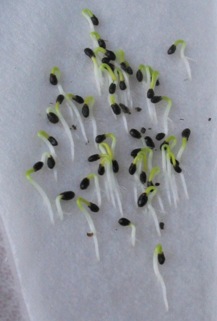
See how the roots of these newly sprouted navarretia seedlings all
align the same way. This is the result of storing the baggy in the upright
position, letting the roots seek the downward direction. |
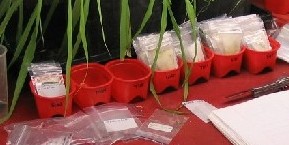
Seven little bins no longer hold potato chips. Instead, each holds the baggies
that are due to be checked on the day of the week marked on the front of the
bin. |
The first sign of germination is usually little white radicles (first
roots). For some seeds, these roots grow amazingly fast. The first time you
notice they've germinated, the roots may already be an inch long! For this
reason, I keep all of my baggies (except for the ones needing light or warmer
temperatures) in
upright position. This way, the roots grow down along the filter paper,
instead of trying to grow through the paper.
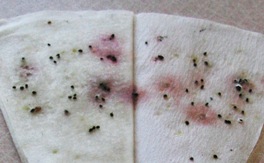
interesting color combinations... |
Sometimes, you get a moldy mess. Often, when seeds mold it means that
they weren't viable. But don't be too quick to discard baggies that grow
some mold. Some seeds have symbiotic relationships with mold, which, even
though it looks dreadful, actually helps it to germinate. Doing the seed
check routine in the vicinity of a source of warm soap and water or
disinfectant wipes, to wash your hands after handling particularly moldy
baggies, can help limit the cross-contamination between baggies. Even so, I
don't usually follow this advice myself, and don't have much trouble with
mold affecting viable seeds.
Ah - soil at last!
I usually transfer the germinated seeds to cell-packs or pots as soon as
they sprout radicles. Especially with small seeds, this is a delicate
operation. I avoid touching them with my hands - I've found that the blade
of a pocket knife, moistened by a quick lick to make 'm stick, makes for an
excellent transfer tool, but you'll probably find that something else works
best for you. After I've transferred as many seedlings as I think I'll
need, I usually keep the baggy with extras around for a few days, just in
case any of the ones in the cellpack succumb to damp-off or meet some other
terrible fate.
Some species do just fine with this treatment, and happily live in the
baggies for as long as two weeks after they germinate. Others don't
appreciate this birth procedure at all, and go into decline shortly after
germinating. Often, the tips of their radicles turn brown or black.
Sometimes, they are still viable when this happens, sometimes not. It takes
experience to know how quickly you need to take action after germination.
With some species, I've found (more recently: I'm still learning!) that it
helps to leave the seeds in the baggy for a few days after they develop their
root, in order for the seed coat to soften and leaves to develop. For example,
many anemones have trouble shedding their seed coat if they are set in soil
when their root first emerges: the seedlings just develop a stem, topped by
unopened tough seed. Sometimes spritzing the seed with water helps, sometimes
it doesn't. It works better to leave them in the baggy a few days, until green
leaves make their appearance. I'm trying this for more and more species which
germinate just fine but often fail to develop leaves in their pots. I'll try to
make a point of mentioning this in my seed-starting details for individual
species.
And then...
Once the seedlings are in a soil-holding container of some sort, the
baggy method has officially come to an end - they are now just like any
other seedlings, needing light, water, and nutrition in all the same ways.
Read more about that on my general seed-starting
page.
All of these are just my personal observations. Please
let me know if you have questions or comments.
Visitors to this page have left the following comments| melvinwichita@cox.net | Aug 15, 2005 | Your article "Germinating seeds in baggies" is very inforamtive and I am sure it will be helpul to me. Thank you for making it available... ...Melvin |
| Rob Oliver | Sep 01, 2005 | Hi Rob,
Thanks for all the information on your site... it is very generous of you and very helpful for a novice like me. I haven't gardened in 30 years and I am just now getting down and dirty again… having a wonderful time! I was an avid gardener as a young man from age 7 to 18...then life took me in another direction. I've lived in New York City, for many years...in a high rise building and the rooftop terrace was closest thing to a backyard here.
Now however I am creating a garden for my parents at their home in a suburb (they are in their golden years and they have mobility issues) the idea is to give them a yard that provides inspiration and a quiet refuge that they will enjoy spending time in without feeling confined or limited.
I've decided to grow from seed which I did a good deal as a young man. My memory of the process is beginning to return to me and your article on seed germination was very helpful. I am confident it will work out.
I'm using the flower garden at the horticultural center/estate in Riverdale NY called Wave Hill as my model… www.wavehill.org but some of the varieties are proving difficult to find. When I did a Google search for "Browalia Americana" your site came up. The seed does not seem to be available from the commercial growers. Would you know who sells it? Or being that I have no seed to trade with, would be willing to sell me the seed yourself?
I very much enjoyed peering into your garden and will continue to do so as my new gardening journey unfolds.
I think browallia is available from commercial sources, but my offer at my seed trade/sale page is still good, too. |
| Sue Hayden | Nov 06, 2005 | Enjoyed your article on baggie germination.I had used one similar but your
standing the bags upright makes more sense. I have just watersprouted some
Esperanza seeds and I'm not sure how long to wait to put them in soil. I know
this is not the time of year to start them but I thought I would try them while
the seeds were fresh and just to see if I COULD! If you can,let me know when
I should plant the little seedlings.
I put them in soil as soon as they sprout. I think they prefer it that way :-) |
| Anastasya | Feb 25, 2006 | Thank you for being generous with your resources... I hope that you will receive more than you need for your time and
energy. Keep at work! |
| Debra | Mar 03, 2006 | Great site. Informative. A lot of practical and essential info presented in a logical, easy to follow manner. Thanks for sharing your germination and culture experiences. It really helps to know what's worked for you and perhaps it can help save the rest of us from "disappointments". |
| Jennifer | Apr 21, 2006 | Wow! Everything I needed to know without having to ask 100 "stupid" questions. I will definitely be printing out copies for myself and friends! Thanks so much : ) |
| Whitney | May 09, 2006 | This baggy method is the best news I've heard in ages. I have a bunch of special seeds I have been wanting to germinate but I know some of them may take up to a year. I constructed myself some old-fashioned wooden seed trays which work perfectly except that the only place I had for them was my enclosed porch. This is also the playground of my 7-month-old kitten. With the gravel on top of my freshly-sown seeds I knew what my tray looked like (a litter box!). And sure enough, after about 2 weeks good old kitty dug up the tray. . .then used the 'litter box' to add insult to injury! Now with your baggy method I can hide my precious seeds in bags until they can find a safe place in a biocell. Thanks! |
| DUG | Oct 26, 2006 | Rob. One of the best sites for germinating seeds. Simple and very straight forward. |
| Amy | Jan 09, 2007 | When transplanting the seedlings to soil, do you cover the seed, or leave it on top of the soil, only covering the root?
I generally open a slit in the soil with a pocket knife, deep enough to accept the developing root. If the seed hasn't sprouted leaves yet, I set the rooted seed with the top of the seed at about soil level; if leaves are showing, I position the seed leaves at just above soil level. |
| Gail McIntosh | Jan 16, 2007 | I spend a small fortune on BioDomes and fancy 'stuff' to germinate my seeds every year.............so glad to find this site and thanks for sharing!!! |
| Mary C. | Jan 17, 2007 | I am so glad I found your site! This sounds so easy... I can't wait to get started! Thanks Rob! |
| Brad Jackson | Feb 08, 2007 | Rob
I'm glad to find your site it only confirmed my method. I had planned to start seed in baggies much like your method but was told it wouldn't work well but I was sure it would work just fine and it did. Please keep this site up it is a good source of info for both expewrienced and amatures. |
| fay | Feb 12, 2007 | This looks very interesting - I'm going to give it a try. Will let you know how I get on! |
| Jean-Pierre | Feb 20, 2007 | I am trying your baggy method. Seems very interesting!
I have a question about the very small seeds like Nicotiana. How to put them in the soil after sprouting ?
Use a delicate tool. I use the tip of a pocket knife, moistened so it holds the seedling by surface tension. It's a tricky operation with the very tiniest of seeds - but nicotiana is quite doable. |
| Suzie~ | Feb 26, 2007 | Thank You Rob. I haven't been successful in seed germination in the past. I have great confidence that the 200+ hosta seed I'm about to start using your baggie method is going to bring me lot's of hosta babies-!!
I also know where to go now when I wish to shop for plant related items. Great Site!
Actually, hostas are one of the few seeds I start directly in pots - but your results may differ from mine. Make sure you have real seeds, not just flimsy duds - a common problem with hostas. |
| Nita | Apr 27, 2007 | What a great method. I'm going to try this today. |
| Eric Vey | Apr 30, 2007 | Rob,
Two years ago, I stumbled upon your site when searching for techniques on starting Hosta from seed. I tried the baggie method, figuring on roughly a 50% germination rate, and was astounded with nearly 100% success. Thus, I ened up with over 270 Hosta seedlings! Once all the supplies have been obtained, your overall method is truly a money-saver (plus it's more gratifying). This year I am trying Coleus, Impatiens and Forget-Me-Nots. Thank you for all your helpful techniques and tips. |
| Katriana | May 16, 2007 | Wow! This looks like a method I'll have to try. Considering I have the exact opposite of a green thumb when I try to garden (seriously, I'm not even allowed near my mothers garden anymore) this looks like a good way for me to show them all! *insert evil laughter here*
Strangely enough I had done something similar entirely by accident when I was a child. It involved a home made denim "bean" bag stuffed with popcorn. It sprung a leak and got put in a baggie, then promptly forgotten outside (where it got very wet). When I found it a few weeks later there was a tangle of roots coming out all over it. It was pretty shocking to learn that common popping popcorn will actually sprout given the right circumstances. I haven't tried to duplicate that accident and I wound up just throwing the root bag out because, well, I was a kid and it smelt kinda funky. But it just goes to show that a baggy and adequate moisture can get just about anything to grow. |
| Higgy | Jul 22, 2007 | I am glad I found your site. I collect seeds compulsively from everywhere I go, but never seem to get them in soil. I always label with the variety, location collected, date, then I wonder if they are even viable. Well, now I know that some of them are, as I have tried 4 varieties of seed and all 6 seeds of 1 variety has sprouted. The other seeds are getting fat and looking like any day they will send out roots too! Your method has saved me much time, expense, and supplies, by answering the viability question and whether I should even bother with them. Some seeds I have had around for 3, 4, 5 years; some have been stratified. Now I can pitch out the ones that don't take off and collect fresh seed! Now I have to go get those roots into soil! Thanks! |
| Sheryl | Oct 14, 2007 | Thanks so much for putting this up! |
| linda | Oct 20, 2007 | when is a good time to germinate seeds? if i start now will i be setting myself up for growing outdoor plants indoors all winter? would it be better to start in say january with the idea of being able to put my new little plant in the soil in march?
I start anytime between November and April, depending on how long it takes for the plants to germinate and grow to a reasonable size. Most perennials get started in January and February. |
| DJP | Nov 24, 2007 | Hi,
Great web site.
One comment on the baggy method. Some seeds will start growing in the bag and then if immediately moved to soil, stop. I've found it is better sometimes to allow them to develop leaves rather than move them as soon as a root appears. Hemerocalis is one example. Just my experience, and in 99% of cases the quicker out of the bag the better.
Interesting observation! I've not found it to be the case with hemerocallis, but I can see how some species might be too fragile to handle in the just-sprouted stage. I'll keep your experience in mind as I approach this year's seed-starting season. |
| Linda | Feb 13, 2008 | Thanks for your great coffee filter idea! I've been using Deno's book for a few years, but with your article, I now hang my bagged coffee filters in a line in the kitchen. The only problem is I'm getting such high germination rates that I'm going crazy planting all these tiny seedlings I don't possibly have room for in my gardens...(now I give out bagged coffee filters with excess seedlings to my friends)...It amazes me how much abuse a tiny seedling can handle in the transplant process-I usually wait for leaves |
| Samantha | Feb 29, 2008 | Well, truthfully, I have been gazing at my gardening mags, and books for nearly four years now, wishing that I too could have a garden that would give me pleasure visually, and soulfully for years to come. But in all honestly, I never knew how these gardeners could afford to plant so many plants and continue to grow successfully year after year. Now I truly know the secret ( the baggie method!!)
Thanks for opening my eyes to how they really do it. My garden wont cost me a small fortune ...yipeee.
Thanks Rob, your site is informative, knowledgable and extremely useful.
One question, I noticed you are in zone 6, so you most probably deal with warm season grasses. If you have bermuda, how do you deal with killing or controlling it in your flower beds?
Thanks and keep on seeding on :O)
My lawn is cool-season grasses, so I don't have to worry about invasive bermuda (just all the rest of the weeds ;-) |
| tom | Mar 03, 2008 | hi rob
your baggie way of germination is top notch, but once they have shooted and large enough to handle i put them into soil, and blow me within days or a week they have died. could you please help me on this matter and try to find out what i am doing wrong. many thanks and look forward to your reply on this.
many thanks
tom
It sounds like you may be having problems with damp-off - too wet conditions, causing fungal attack to your hapless seedlings. Another possible cause is too little light - seedlings need strong light (e.g., a fluorescent fixture just a few inches above the growing tips) to develop into strong plants. |
| posiepoker | Mar 06, 2008 | Thanks for the helpful tips. Very informative! |
| Bonnie | Mar 23, 2008 | Thanks Rob
You have just turned me on to a whole new way of doing my seeds.A very informative site.Loved it. |
| petunia | Mar 26, 2008 | I have experiamented with this filter with seeds and have very good success.
90% of my seeds have rooted quicker then what the pkg even says. Then I have put them into soil in styrofoam cups that are currently sitting on my window sill waiting for weather to warm up. Thanks for this advice. |
| ginpan | Apr 30, 2008 | Thanks for this info, Rob. I tried the coffee filter method and had almost 100% germination. It is so much faster, and you're able to see what's normally going on "underground". Many thanks. |
| CinCin | May 02, 2008 | Thanks for the information. I had some seeds that were 3 and 6 years old, some that I had brought back from my moms garden in Sweden. I didn't know how long seeds would last. I wanted to test the seeds and couldn't find any information until I found your page! I tried a little different variation for germinating the seeds, instead of the coffee filter, I used a paper towel on a baking tray and plastic wrap over the top. I was able to get a few plants out of the seeds, that was good because I was afraid none would come up. It was better than planting them outside, and trying to figure out what was what, this was much better. It was enough space to lay out several rows of different types of seeds and I could see when they started sprouting and move them over to some seeding mixture to continue the process. My efforts were plain and simply and trail and error, maybe I was lucky that it worked for the seeds I had. I didn't know there was so much to germinating seeds. I still have much to learn about the cold and warm germination and the light and dark types, I'm going to see if there is any information on which plants need what type of germination environments now. Your site had some excellent and easy to understand instructions, thanks again, and happy sprouting! Have a wonderful growing year to everyone!
|
| Sasha | May 03, 2008 | Thanks so much for the info! I plan to start several seeds this weekend with the baggy method. Again, thanks!! =)
~Sasha
Sasha's blog |
| Paula Canton | Jul 06, 2008 | Geweldige methode!!! Ik ga dat ook proberen. Beter dan de "oude". Daar moest je, als de kieming niet vlotte, altijd gaan wroeten in de potjes om te zien wat de zaden deden. Dank je wel. |
| Johnny_A | Jul 18, 2008 | Hi Rob, great website! Thanks for sharing! Are the "seed trials" offline? Thanks
Not sure what you mean by seed trials, Johnny. Any specifics on germination are noted on the individual plant pages. |
| NZ Gardener | Aug 31, 2008 | My father told me about the baggy method, and I tried it and it worked great! But he also went another step, and for example carrot seeds - he would sprinkle them in a long line, as long as he needed on paper towelling, damp, roll/fold up, and sprout in the plastic bag. Then he would take the strip and lay it directly on his prepared garden soil, sprinkle very lightly with soil, and leave to sprout the carrots through the paper towel and into the garden. He was a fantastic gardener, and really knew how plants and soils, and always had amazing results. He's since passed away, and I can't ask him for more advice - but I wanted to know if you could add anything to this - rather than disturb my sprouted seeds, could I put small squares of papertowel/seeds directly into my pot, and grow this way? thanks so much!
Thanks for sharing your father's methods! I'm sure it works great, and would work for various kinds of seeds (as long as their roots are strong enough to penetrate the paper). It would work best with paper toweling, which I don't use because it deteriorates more quickly than filter paper - but would be fine for quick-sprouting seeds. I tend to start so many seeds in a small folded filter that I could not cut individual pieces, but again, for a smaller number of larger seeds that sounds like an option. |
| Lorraine | Oct 30, 2008 | Thanks for a great website!!I have several types of seeds that need the cold stratification treatment, but didn't want to have to put trays of damp peat in the fridge,(pretty sure hubby wouldn't like it). Your way seems simple, won't take up much space at all and is a lot more sanitary! |
| Sharon in Warren, CT | Jan 01, 2009 | Another question - what veggie/fruit seeds do you recommend starting in baggies and which start well in pots? I have just about every seed and am ready to go with your advice.
I've fallen into a groove of starting just about anything that needs an indoor head-start in baggies. But most vegetable and many annual seeds germinate in high percentages, so that they could be started perfectly fine in six-packs or pots. It's a matter of preference and space under lights. |
| Sue taylor | Jan 11, 2009 | With Paeonia 'Molly.' and other tree seeds that take 2 - 4 years to germinate would you use the baggy method or just put in cold frame in garden? Your web site is very informative and interesting, thank you!
For seeds that require more than one cycle of stratification I don't use baggies - those go into pots that I set out in a shady part of the garden, and let the elements do their work. A much lower rate of success, for sure, but I find I don't keep up with baggies through the warm season, no matter how good my intentions are... |
| Niyam Sharma | Feb 06, 2009 | The beggy method is Very informative and reproducible. |
| Michelle | Feb 18, 2009 | Hi Rob, I am eager to get started with the baggie method, but the instructions on my veggies say to start indoors 4 weeks, six weeks etc. before last frost. If i start them earlier, will i simply end up with larger more robust plants? Also, i want to experiment with cosmos from my last years flowers to check their viability, will this work on such tiney seeds? Thank-you !
Only with truly dust-like seed do I hesitate to use the baggy method. Cosmos is positively cannonball-sized by comparison! As long as you can provide sufficient light, you can give your veggies a headstart. For some, it will be helpful, for others you're better off waiting till the recommended time. You'll have to experiment to see what works best for you. |
| gene | Feb 19, 2009 | Rob excellent web-site. I have some flowers seeds that came with germination instructions. They reccommend sowing the seeds in a starting mix and them refrigerating for 3-6 weeks depending on the type of seed.Then removing them from the fridge. This of course takes up more room than I have. Do you think your system would work for these types of seeds?
Absolutely. You can germinate all the way in baggies, or you can just put the seeds in a baggy with some damp potting mix, and transfer the seeds/mix to the top of pots/cellpacks at the end of the cold stage. |
| Karen Haberer | Mar 09, 2009 | Rob, I came across your method winter of 2007. I've used it successfully both last year and this past month for germinating impatiens. With this method, the germination time is greatly shortened. I started this year's seeds March 2nd. Today, March 9th, I am seeing sprouts. (I hang the baggies from the kitchen valance in a south window.) Germination in starting medium takes approx. 21 days (for me anyway). I plant 180 - 200 impatiens per year so starting from seed is very cost effective. I can see how many seeds germinate in a (short period of time) with your baggy method. This is also efficient. Thank you for your very imformative site. |
| S.E. | Apr 23, 2009 | Thank you for sharing the info; it was very generous of you. In the 1960's we used pieces of paper towel, but this is far superior! |
| Ashley Padmore | May 15, 2009 | Your site is very helpful. The baggie method is excellent. I've had next to perfect results with all of my seeds, except for Delphiniums. I know they're poisonous. I have 2 small kids under 3 yrs of age. Are the seeds poisonous to handle also? Would I have better luck just planting directly into the ground?
I don't believe there's any danger in handling delphinium seeds - as long as you don't actually eat them. In most climates, I think you'll have better luck providing controlled germination conditions rather than the vagaries of the outdoors. |
| Isaac | Jul 06, 2009 | Thanks for a great site!!.. I will try the baggy method to germinate paulownia tomentosa seeds.. I live in Cabo, Mexico.. Its coastal desert weather with lot's & lots of sun.. I saw these beautiful trees in a public park in dry Phoenix Az, so i figured that if this tree can live in Phoenix, its also hardy enough to live in Cabo too =)
Again thanks (gracias!) for a great web site!!
|
| Isaac | Jul 13, 2009 | i took 2 coffee filters with 5 seeds each, i dipped one of the filters in a glass were i previously had disolved some worm castings, then i folded both filters as explained on the site with a fluorescent light some 20 inches away.. The result was very cool, the seeds on the "clean" filter sprowted long white roots, while the ones on the "dirty" dipped filter came out even longer plus very tiny leaves on them.. Im transplanting them to dirt today!! Gracias Roberto!! |
| Jim | Sep 05, 2009 | I want to germinate seeds obtained directly from plants in my garden - calendular, cornflower, lilies, mecanopsis, aquilegia etc. Will the baggie method work for all of these?
It will - but it may not be the most convenient method for some; for example, it may be easier to direct-sow calendulas and cornflowers to the areas of the garden where you want them to grow. |
| Christine | Apr 14, 2010 | I have done the paper bag method and works great, they germinated. My problem is when I plant them in soil, they die. Can anyone tell me what I am doing wrong?
Some seedlings are bound to die with whatever method you use, but in general there should be an excellent survival rate. Can you give a bit more information about what you're trying to grow, how you're transplanting them to soil, what conditions you're giving them, and what happens afterwards? |
| Christine | Apr 15, 2010 | I have germinated seedlings in some seed starter mix & Miracle-Gro potting mix and I also used potting soil. I am planting veggies like tomato's, green peppers, serrano peppers, radishes. Snap Peas. Flowers, I am trying to grow is Marigolds,Four-o-Clocks, Johnny-Jump-up.I am also trying to start Herbs like, Basil, Dill, cilantro. I spritz the soil with water and then take them out of the baggie and lay it on top of the soil,trying not to disturb the roots and then sprinkle them lightly with soil.I then move them into my living room by a big sunny warm window. (I also use a grow light).Then some wilt & die right afterwards and some get about 2 inch long and then the die.I try not to over water where is is soggy, I spritz them lightly with a spray bottle with room temp water.When I use the paper towel method they look so good ,before I transplant. Can you tell how long I can leave them in the paper towel and baggie method before I transplant into soil? Thanks, again
I'd get all of those out of the baggy and into soil as soon as you see them sprout. What you want is a bright window, but not necessarily harsh sunshine. I dibble a hole in the potting soil for the seed root to go into, that probably provides a better anchor for the seedling than laying them down and sprinkling with soil. Good luck. |
| Christine | Apr 16, 2010 | Thanks for the info, you helped me alot. Now do I water the soil lightly before or after I plant them? Thanks
I bottom-water pots after I place the seedlings, by setting them in a container with an inch or two of water. |
| Chandramouli | Apr 26, 2010 | Hi Rob,
Great site you got here. I sowed (or placed? :D) Eggplants, Pepper, Strawberry, Sunflower, Nasturtium, and Rocky Mountain Columbine seeds yesterday after reading this fantastic page. We don't get coffee filters here like the ones you describe (I'm from India) so I used the thin tissue papers. All the seeds are literally exposed - I mean I am able to see the seeds through. I read that strawberry and Columbine requires light for germination but is this okay for others too?
Also, I pressed the tissue together and they seem stuck - is this okay? Can the roots grow through them or do they needs some air gape inside?
I noticed that my sunflowers and nasturtiums stained the tissue, so I changed it today morning. Is this okay to disturb them by changing the media?
One more Q: My strawberry is staining the paper too, but I am afraid to damage the seeds while trying to remove it. Is it okay? I heard does strawberry does this for germination. Is this a myth or true?
Sorry for so many questions. :D
With apologies, a late reply. Tissue paper should be OK, although keeping it properly moistened may be more difficult if you have less material to work with. As you mention, you may also find it more difficult to extract the seeds once they germinate, because the layers cling together so tightly. The vast majority of seeds either require light or are indifferent. Dark-germinating seeds do exist, but I don't believe any of the ones you've started are among them. Staining of the paper by seeds really isn't a problem (unless the seeds contain germination inhibitors that must be rinsed away - in which case you're better off starting the process by several soak/rinse cycles before starting with the baggy). |
| Marianne | Apr 27, 2010 | I really like the picture of the pot flinging! If you are willing to be a little less abandoned and a bit of a rebel, a bit of bleach in the wash water takes care of the fungus... and the leftover washwater goes on the worst patch of dandelions in the gravel driveway. |
| Leslie | Nov 22, 2010 | I'm new to this method, I have some seeds that require cold storage before germination,(Crape Myrtle-Muskogee,Crape Myrtle-Pink Velour. I need to know how long should I keep them in cold storage before germinating them to warm climate?
According to the records on my crape myrtle page, I gave 4 weeks of moist cold treatment, followed by low germination at room temperature. I'd go for 6 weeks cold/moist, and hope for better germination rate. |
| Keith L | Feb 08, 2011 | I'm going to try the baggie method with some rather stubborn Tacca seeds. I'll let you know how I get on!
For pricking out my preferred tool is the small bamboo skewers (as used in chicken satay). |
| Glenn Steinberg | Mar 29, 2011 | Do you know a way to get Norman Deno's book? I tried amazon.com, ABEbooks, and others with no success.
Back ten years ago, I got it directly from Deno at Penn State. I don't know how it is currently distributed. |
| Glenn Steinberg | Apr 08, 2011 | For anyone else who might be interested in Deno's book: by searching online, I was able to find it free as a pdf from the National Agricultural Library of the USDA (12MB PDF). There are also two
supplements available at the same site.
Thanks for the reference, Glenn. |
| janice lewis | Apr 14, 2011 | THIS is very helpful to me . because I loves growing sunflowers in my own back yard ,so I can watch them grow . I don't know if I WAS OVER WATERING THEM or WHAT . I hope they be successful this time. IF THEY LIVE I WILL SEND YOU A PICTURE OF THEM IN MY YARD |
| Allie | May 25, 2011 | Can I use this process for tomatoes, peppers, eggplant, parsley or butternut? and if so can i leave them outside overnight?
Yes, you can start seeds for all of those in baggies - although personally I start squash directly in the garden, since it does just fine that way (unlike the others, it doesn't need a head start on the season). I guess you could leave the baggies outside overnight, but you may fare better with controlled indoor conditions – all but the parsley germinate best with warm conditions. |
| livtodance | Aug 21, 2011 | These are wonderful instructions. Thanks so much, Rob. I'm about to try this with Petunia seeds that I am waiting to receive as I write (I'm in the northeast region of U.S.). Did I understand correctly? For seeds that require light, lay the baggie flat, rather than in an upright position? Thanks so much!!!
Either position will work - but it's easier to get light to shine down on a horizontal surface, that's why mine lay flat. |
| jim | Sep 04, 2011 | why do they start to die when i put in soil.but in baggy the start to grow again..."no heat"? No water...i dis water lightly, not heavily..ty-at first i put it in soil before seed cracked for the leafs...but root was visible...it started drooping and dieing...i put it back in the baggy--it broke open the seed and stated growing longer and leafs...so i put it back in dirt and its dropping again...minimul watering...mabey not enough?
With some seeds, it's best to leave them in the baggy until the leaves have freed themselves from the seed case. But after that, they really should go into the soil. When watering, let your containers soak up water from the bottom until the soil at the top is dark from being moist; then leave them alone for a few days until the top soil looks dry. |
| Bobby | Sep 05, 2011 | I am definitely going to try your method in germinating seeds. I will give you my results in a few weeks. |
| Pat, in the UK | Nov 19, 2011 | How I wish I'd come across this site 6 weeks ago because 5 weeks ago I sowed about 10 different species of seed in to 3" pots of compost topped off with potting grit. About 2 weeks ago a single seed in each of 3 pots germinated. Now I have the difficulty or removing those single seedlings without damaging them, nor disturbing too much the other seeds left in the pot which may (or may not) have started to germinate but not risen above the grit yet.
Still, I have about another 20 varieties to sow starting late January and having learned of this method I think it extremely unlikely I'll ever be sowing perennials in pots/trays of compost again.
Rob, thank you for an extremely informative site. I consider myself an experienced amateur gardener (I've been growing from seed for about 10 years) but I find it amazing that I've never come across this method of sowing before. Actually though, having said that, I have always started off my sweetpea seeds on damp kitchen paper laid out on a tray, covered in clingfilm, and potted them up only once their root has appeared. Why did it never occur to me to do something similar for all my perennial seeds? The difficulties I've had pricking out tiny seedlings germinated in compost and grit!
Good luck with trying your hand at baggies, Pat. I hope it works as well for you as it does for me! |
| nichols in texas | Feb 01, 2012 | I just found your site totally by accident and it does seem as if it is doabe for me. The question I have is you are placing the seeds into the filter which I do understand then into the frig. in a container upfight position that I also get but after the seeds do sprout could a amount of dirt go on top of the seeds several days before setting into pots or garden by opening up the filter and laying it flat with the seeds expossed as well as misting them. Seems to me this would not put the seeds into shock and make the foots stronger. Will check back for your responce. O covering only the roots only not the full seedling.Thanks again
Different seedlings certainly respond differently to growing-on conditions once they sprout their roots. Some prefer to be potted up immediately, others benefit from waiting until the first leaves unfurl. I've not tried anything more elaborate, such as the approaches you suggest; in my experience, most seedlings do just fine going straight from being between the layers of the filter paper into the soil. But it's always good to experiment; be sure to share your experiences with other gardeners if you find useful add-on techniques. Good luck! |
| Edith | Feb 05, 2012 | do i have to put hollyhock seeds in the fridge after i bag them;
i just found your site and i am sure glad i did . many thanks
Edith
Hollyhock should germinate without a hitch at room temperature. |
| annie | Feb 07, 2012 | I chanced on your website and marvelled (with gratitude) at your methodical procedures, your careful observations and the generosity with which you share all details of your Baggy Method, (I have become a fan). Thank you Rob. I'll be back. |
| Ariel | Feb 24, 2012 | How long does the baggie method makes the plants grow until ready, and is it faster compare to growing plants in soil?
This method doesn't really speed up the process of growing plants from seed - it just makes it more precise and better controlled. Time for germination and growing on of course varies greatly with the species and types of plants grown. |
| jenifre | Mar 14, 2012 | Yey!! Wonderful site!! I am about to germinate my tomatoes, peppers and corn do any of these have temperature or light requirements during the baggie method germination? Again - kudos to you!
None of those require light to germinate; all of them appreciate somewhat higher temperatures (just above a typical room temperature). Good luck. |
| tresa | Mar 25, 2012 | ...please forgive me, as i have to pause* happy tears, and an excited heart for finding this page, and forum by accident. coincidence? i don't believe in coincidence.:) i have a degree in interior design, have worked in the building, and construction trade for 13 yrs. i knew when i was 4 or 5 years old i was born to create...i grew up in the pacific northwest. free to roam the forest, valleys, and rivers of my childhood. my mother taught me about native plants. edibles, medicinal, ornamental...aromatherapy. it was an intoxicating experience. she was an avid artist as well. after long summer afternoons of investigations, making forts with sticks, and covering with moss...munching on clover, and violets, id spend evenings looking at my mothers landscape drawings, and falling asleep with latin names in my ears....ive let go making a living with architecture. im literally being called back to my roots. i ran an operated an aquatic greenhouse business by pure accident...volunteered, and have been employed by landscapers, and landscape designers...from hard labour, to the delicate art of seed germination. (seed germination lessons from seriously, a complete seed nazi snob who was the most difficult person ive ever had the pleasure to "work" with...) im going to open my own business of aquatic plants, fish, and pond supplies...while i do more research, and develop business plans etc. this summer im going to start a complete community garden, volunteer with local food banks, sell, and give away the organic "goodies." (with monsanto, and other detrimental food sources that have been shoved down our collective throats, i am going to change my reality, my families reality, and my communities reality on how food is grown, and consumed...as well as study, propagate, germinate, educate myself and others on the magick of seeds! ( aside from that adventure, and what that entails, for my own guilty pleasure of tranquility with ponds, and water features, do you have perhaps any additional information on how to germinate lillies, or bog plants?) lol, i feel like a new born bee!!! gratitude to you, your readers, and the awesome power that is law of attraction~ blessings~
Good luck in your pursuits, Tresa! |
| Ray | Apr 09, 2012 | Yearly, I sow 1250 impatiens seeds of five colors,resulting in nearly 100 percent germination. I buy a fresh tray furrows each year, and fill them with Pro Mix BX artificial soil, sow the seed on the surface, gently press the seed into the mix. This tray is then placed into another larger tray that I've insulated on the bottom and sides, covered the insulation with thin wood board and afixed a 74 degree heating cable. Then I cover with a clear plastic dome over which I've placed blue Reynold's plastic wrap.
This year the red Accent had some nice vigorous plants but far too many "runts". I'm wondering if the red should not have the blue plastic over it. My white Accents were better than the red, but not as good as the lilac or the rose in uniformity. Red Splash Super Elfin were also very uniform. |
| Abbi | May 06, 2012 | for a science project, i need to know what pinto beans would grow best in... water or miracle-gro during the first eleven days of germination...please comment below and let me know what you think:)
I think you need to try it for yourself, using the scientific method :) |
| Janet | May 30, 2012 | I read about this method at another site - the author actually recommends planting the folded filter paper with sprouted seeds directly outside - she said the seeds will grow through the filter, which degrades in the soil. Is this true?
I don't recommend it. I've tried to do so on a few occasions, when the seedling roots are hopelessly entwined in the paper, but I've found that the paper becomes moldy even when buried in some potting soil, with adverse effects on the health of the seedlings. But obviously the author of the other article has had different results, so it's worth trying both methods and see which one works best for you. |
| Sue UK | Feb 03, 2013 | Rob, thank you for all of the wonderful information on this site which I have found to be such a valuable resource over the years.
Until this year I havee been starting my perennial seeds traditionally in small pots, either outside or in the greenhouse. But this year I subscribed to a few seed exchanges and have been faced with the reality of hundreds of seed packets and not enough space. So, I decided to take the plunge and try the Baggie method.
I did try the Deno method a few years ago but was troubled by a lot of mould on the paper towels and didnt have a lot of success. This time I am trying a variation and I would very much like your comments.
Instead of using paper, I have used sterilized vermiculite dampened with a weak fungicide solution. I have also been worried about the amount of air getting into the bag, so I have added a small 'chimney' made from a portion of a narrow plastic drinking straw. This means that I can very easily add a few drops of water using a meat basting syringe from time to time.
I have only done half of them so far and I wondered what disadvantages the vermiculite might have... And whether I should do the rest of them exactly according to your method rather than my own.....what do you think? |
| Meredith | Mar 12, 2013 | This is a very good information. I plan to try this myself. Finally a way for me to start some very small and difficult seeds.
|
| Judy Showers | Jun 04, 2013 | Although this the first time I have read your method, I have been using it for the past two years and I am very happy with the results. I wlll begin using coffee filters & avoid touching the seedlings with my bare hands but even doing that, I still get great results. Thanks, Judy Showers, greenhouse grower in zone 6b. |
| Rachel Corcoran | Sep 22, 2013 | My name is Rachel Corcoran, I am a transition year student in the convent
in Roscommon town. I am entering the BT Young Scientist, my project is
'How Germination Rates Can Be Affected By Seed Exposure to Mould' I was
wondering could I ask you a few questions in relation to my project. We
plan on exposing seeds to mould while in the fridge and then planting the
seeds, we will vary the time the seeds are exposed to mould. My questions
are:
-What seeds germinate quickly?
-What seeds germinate slowly?
-Is there any other place apart from a fridge that would be good to leave
the seeds?
-What mould could/should I use? I know I could use blue-mould from bread but is there any better examples of mould I could use/find?
Looking forward to hearing from you, Rachel.
Rachel, that's more questions than suitable for the comment section on this page. Please contact me by email using the link at the bottom of this page, and I'll give you my thoughts. |
| mica | Jan 06, 2014 | I did the baggy method with pomegranate seeds the root has come out a little bit but then it turned green when the root was really short is it mold?
I've not started pomegranates. It would be unusual for a newly emerged root to mold, but without seeing it it's hard to say. |
| Blomma | Oct 12, 2014 | I have done the Deno methods for years on all kind of seeds. Works great on Daylily seeds, then placed in fridge for stratification of 3 weeks.
I always used kitchen paper towels for it is softer and holds moisture better. If the roots grow into the towel, just tear and plant it all.
When seeds need light, it just means that the seeds should be surface sown with no cover. Usually it is meant for small and tiny seeds that would never make it to the top if covered. Seeds don't need light until sprouted.
Thanks for sharing your experience. With methods like this, everybody finds what works best for them. I do take exception to your last statement: many seeds do need light to germinate: light is required for them to sprout, not just after sprouting. |
| Janet Glaser | Jan 14, 2017 | Wow! This is my 1st yr to germinate seeds indoors. Talking about helping a 'newbie' get it 'right if the time'! I feel very empowered! -A Big Thumbs Up to you! |
| RumBum from bama | Feb 01, 2017 | Liked your article. I have use this method with filters, paper towels (plain white), news paper and rags. Filters seems to work best for me. Also I have better germination 90% or better with distilled water or bottle water. Just try different ways to se what works for ya.
Thanks RB OF BAMA |
| Jeremy From Carnarvon Australia | Feb 25, 2017 | I have been having trouble sprouting coffee seed from trees I grow in the garden. I will let you know how this method works in due course... |
| MJ from Upstate NY | May 13, 2017 | Wonderful site. Thanks so much. Question: Once seeds have germinated with tails and leaves can be seen, can it go directly into garden vs pot. It will be in 80s here in a few days, mid May, frost done. Is this ok? Thank you.
In principle they can, but they will be much more vulnerable to the whims of weather (harsh sun, drying conditions, heavy rain) and critter damage (insects, slugs, birds). You'll likely have a lower yield of plants, but it may be worth it if you don't want to deal with the pots. |
| MJ | May 22, 2017 | THANK YOU! It is one week later, May 22, and I just transferred 1/2 of zinnia seedlings from baggie(9 days in)directly into garden. Will keep apprised. Very delicate... |
I welcome comments about my web pages; feel free to use the form below to
leave feedback about this particular page. For the benefit of other visitors
to these pages, I will list any relevant comments you leave, and if
appropriate, I will update my page to correct mis-information.
Note that I discard any comments including
html markups, so please submit your comment as plain text. If you have a
comment about the website as a whole, please leave it in my
guestbook. If you
have a question that needs a personal response, please
e-mail me.
Last modified:
September 22, 2019
Contact me
|